Instead of a full-blown tutorial on how to create something with Storyboards, I’m going to cover highlight 10 things, in no particular order, that should help get you going.
Storyboards are one of the areas I spend most of my time in. I’m a big fan of being able to visualize the app that I’m working on. By simply dragging items onto a canvas, update position information, and set a few characteristics, you’ve created a user interface without touching underlying code. This is important because user interface code can quickly turn your code into a mess.
When I join a new project one of the first things that I’ll do is find their storyboards. They can be one of the more useful places to visit to get a very high-level view of the structure of the app.
Without using a visual editor you’re dealing with a very manual process to discover where things are flowing. You have to waste a lot of cycles just to get a mental picture for how a given view is laid out by navigating your way through source code. You could clearly reference design documents or run the app and navigate to the desired area, but I’d prefer to avoid that if I can. Finally, in certain situations, tweaking interface components becomes a tedious process. Instead of making quick adjustments within a storyboard you’re constantly building and running your app to verify things are where they need to be.

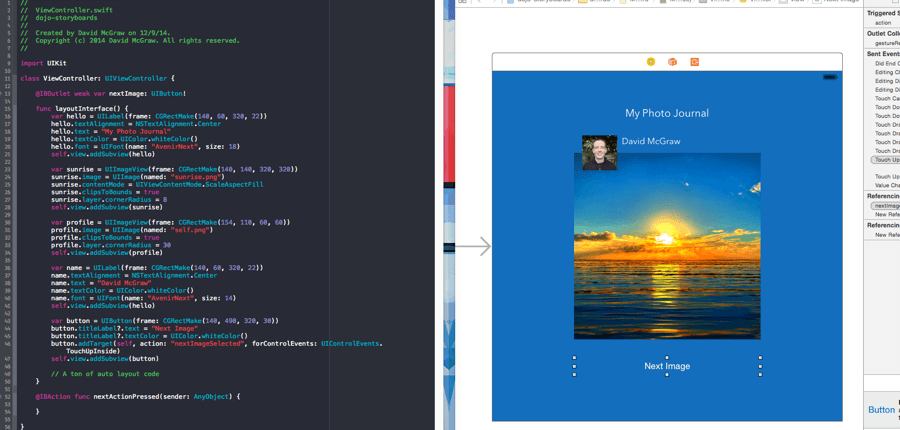
Look how much code it takes just to create the simple interface to the right, and I haven’t even included any auto layout code to help us with positioning. I know there will be die-hard code folks out there, but I just can’t get past bloating my codebase–it’s nasty. Don’t get me wrong. For beginners there is value in understanding how to create a user interface object within code. It also helps to scan over the documentation for a given user interface object so you have a general awareness of what it can do.
The List
There can only be one… wait, nevermind
You don’t have to build your entire app in one storyboard. Split them up into several boards. Imagine having onboarding, settings, and a main board. This will save you headaches down the road when you app really magnifies in size. Interacting with boards in a team environment will be easier and finding the area you need to work within will be quicker.
What’s an exit segue and how do you use it
First, let’s define what a segue is. Say you have 2 scenes in your storyboard, with the first scene having a button. When you right-click from the button in Scene 1 and drag it to Scene 2, you’re creating a segue.

Let’s say we select present modally. A modal state means that it is the #1 focus for the user. There is no easy way to simply go back to the first scene like you would see if you pushed a scene on a navigation stack. We could create a delegate to inform the first controller that we’re done, but that’s a little tedious. We could fire off a notification telling the first controller that we’re done, but that’s a little overkill. This is a great opportunity to use an exit segue. An exit segue works just like a segue, but returns to where you implement the UIStoryboardSegue action function. This is key! As long the exit segue can navigate backwards through the segues you’ve created, it will find the exit segue no matter where it is along that segue path.
Observe the complex view structure below.
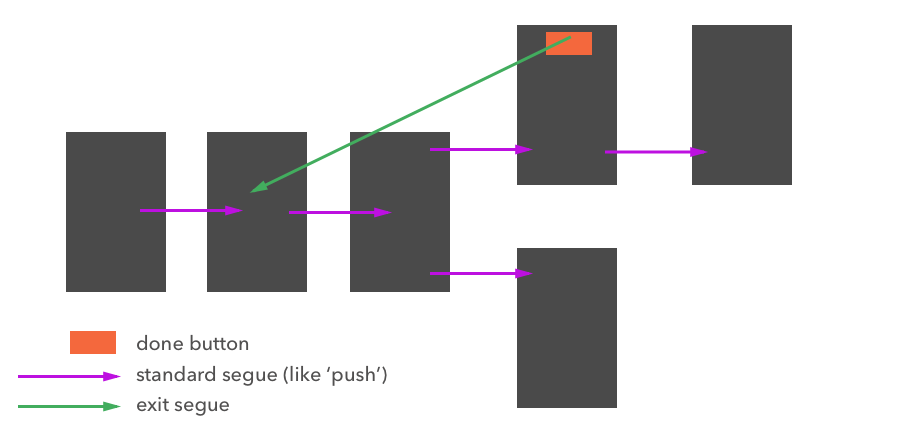
If you simply right-click from a button to the exit segue indicator, you won’t see anything. It needs to detect a method you’ve created a UIStoryboardSegue action at the destination controller (where the green arrow is pointing). For example:
@IBAction func unwindToSceneA(unwindSegue: UIStoryboardSegue) {
    // be sure to give your unwind segue an identifier so you know where we're coming from
}
Jumping Storyboards
You don’t need to draw a fancy segue in your storyboard to go where you want to go. You just need to initialize the storyboard and fetch the controller that you want to display. Once you have the controller told display then you can call the necessary display method.
var storyboard: UIStoryboard = UIStoryboard(name: "Settings", bundle: nil)
var modal: UIViewController = storyboard.instantiateViewControllerWithIdentifier("settingsStoryboardId") as UIViewController
self.presentViewController(modal, animated: true, completion: nil)

/* If you're fetching a controller in the same storyboard you're already on,
 * then you can skip initializing a new UIStoryboard object.
 */
var modal: UIViewController = self.storyboard?.instantiateViewControllerWithIdentifier("customStoryboardId") as UIViewController
self.presentViewController(modal, animated: true, completion: nil)
Preview Editor
It can be quite tedious building and running your app all of the time to observe if your user interface tweaks had the impact you wanted. This is especially true when dealing with auto layout.
 

Now that you have the preview editor open you can modify your view and watch how it reacts to your changes. You can also preview your interface on multiple screen sizes by pressing the + button on the lower-left side of the assistant editor panel.
Give Those Fingers a Break
If you have a button that you need to connect to your source code you can right-click + drag a line to your source file to generate an outlet for you.

On the flip side, you can generate an action for a given event by clicking + dragging into your source.

The final result from the above actions.

Now why in the world would you do this stuff? Well, the action is the most obvious. If you don’t create that @IBAction function then nothing will happen when you press the button. You could imagine adding code that’ll change the image that we’ve set in the UIImageView. In order to change the image we’ll need an @IBOutlet so we can access it.
Avoid Incredibly Complex Controllers
While your controllers can manage a lot of subviews, you risk making things a complete wreck by adding view on top of view on top of view. Pretty soon you’ll have a really hard time taking advantage of the entire purpose of using a visual editor–providing a clear view of what you’ve built. If you have a complicated view structure on a controller then it might be time to consider a couple of options.
You can use a xib (pronounced ‘zib’) or you can add a container view object to your scene & hide it until it’s needed. Usually I fall back to using a xib, but there are certain situations where the container view object works.
When you add a xib you’ll also add an accompanying source file that you’ll use to initialize the xib. For example, lets say we created ExampleView.xib and created a beautiful view. In order to load that view we’ll need to create ExampleView.swift and initialize that xib.
import UIKit

class ExampleView: UIView {

    // normal initialization
    override init(frame: CGRect) {
        super.init(frame: frame)
        self.addExampleViewSubview()
    }

    // will be loaded if we use this class in a storyboard, for example
    required init(coder aDecoder: NSCoder) {
        super.init(coder: aDecoder)
        self.addExampleViewSubview()
    }

    func addExampleViewSubview() {
        var xib = NSBundle.mainBundle().loadNibNamed("ExampleView", owner: self, options: nil)
        var view: UIView = xib.first as UIView
        view.frame = self.frame
        self.addSubview(view)
    }
}
Placeholder Constraints
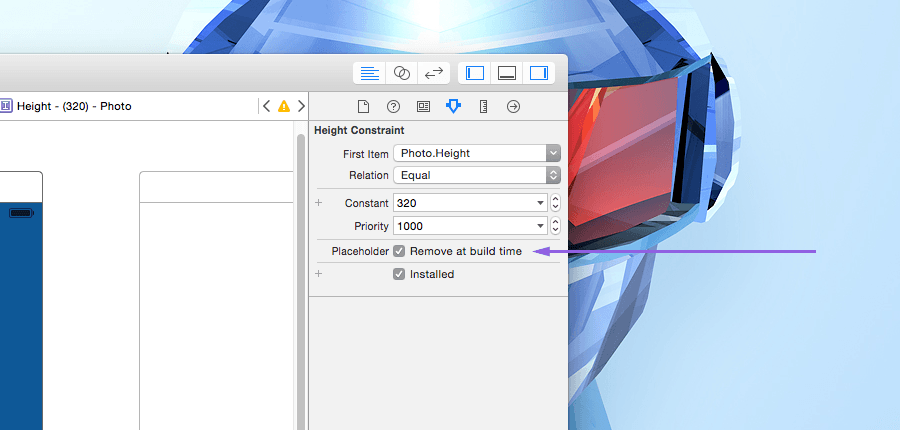
This is one for those who love a mixture of code + storyboards to manipulate constraints. While I do what I can to avoid writing constraints in code, it can be valuable in the event that you are using a view that is not part of a storyboard. It can be a downright terrible experience when you’re trying to create constraints in code and you’re trying to work on your user interface in the storyboard. Never fear, you can easily tell Xcode that a particular constraint is a placeholder. This means it’ll be ignored when you build and run your app.
Default View Controller
You may need to change which scene is loaded with the storyboard. In previous versions of Xcode you would select a scene and toggle Is Initial View Controller. This has changed in recent versions of Xcode. Now you’ll need to search your object library for Storyboard Entry Point. You can then drag and drop it on your desired scene. You can only have one of these active at a time so you can can drag and drop it on a different controller whenever you’d like.
Why would you worry about changing the entry point? Personally, I use it when I’m testing different controllers and I don’t want to go through the motions of tapping a ton of buttons in order to get to the controller. If you just update the storyboard entry point then it’ll load up immediately.
Custom Segue Transitions
If you select a segue you may have noticed that it comes with a few pre-loaded transitions; cover vertical, flip horizontal, cross dissolve, partial curl. What if you want something a little more custom? In that case you’re going to need to create a custom UIStoryboardSegue.
For a simple example, create a new Swift file called CustomSegue. The code below will be executed when our segue is performed (upon button tap).
import UIKit

class CustomSegue: UIStoryboardSegue {

    var startingPoint: CGPoint = CGPoint(x: 0, y: 0)

    override func perform() {
        var source = self.sourceViewController as UIViewController
        var destination = self.destinationViewController as UIViewController

        // Add the destination view as a subview (temporarily)
        source.view?.addSubview(destination.view)

        // Set the start scale
        destination.view.transform = CGAffineTransformMakeScale(0.05, 0.05)

        // Original center point
        var originalCenter = destination.view.center
        destination.view.center = self.startingPoint

        UIView.animateWithDuration(0.225, delay: 0.0, options: UIViewAnimationOptions.CurveEaseOut, animations: { () -> Void in
            destination.view.transform = CGAffineTransformMakeScale(1.0, 1.0)
            destination.view.center = originalCenter
        }) { (finished) -> Void in
            destination.view.removeFromSuperview()
            source.presentViewController(destination, animated:false, completion:nil)
        }
    }
}
This will expand the destination view from a given starting position that we set when the button is pressed. In this case I set the starting position to the center position of the button on the first scene (the source scene).
override func prepareForSegue(segue: UIStoryboardSegue, sender: AnyObject?) {
    let custom = segue as CustomSegue
    custom.startingPoint = self.nextImage.center
}
In our storyboard file we’ll select the segue that we have from Scene 1 to Scene 2. Change Segue to Custom, and then enter the Segue Class to match the one we just created CustomSegue.
Avoiding Source Control Nightmares
For those on a team, and while they’re getting better, storyboards are still a huge pain when it comes to source control. This is a big reason why you should aim to split your storyboards into several boards. If you can avoid it, try to make sure only one person is working on a storyboard at a time. This will prevent some nasty collisions when both of you try to push your storyboard changes to your repository. While it’s not always an easy thing to prevent, be prepared for it. This is probably the biggest reason teams and individuals avoid storyboards.
While I’ve certainly had my fair share of source control clashes with my team’s storyboards, I still feel that the speed and benefits highly outweigh the annoying fixes that I may have to do because of a clash. For the most part I make sure people avoid interface areas that I’m interacting with. But, it still happens once and a while.
Here is how I handle merge conflicts:
- (first line of defense) Being proactive to avoid it in the first place. When working in my storyboards I aim to commit early and often while giving the heads up to any team member also working in the area. Keeping tasks small and focused helps. Don’t go pushing sweeping changes, nuking & adding controllers, when others are in the area.
- If I hit a conflict I run through changes using a diff tool Kaleidoscope. This does require some experience understanding what is behind a storyboard. If you’ve never looked at it, now is the time: right click a storyboard > open as > source code. Observe how controllers regions are laid out (including the connection information).
- (worst case scenario) I figure out who had the biggest/more difficult change and accept those changes, overriding the other. Then we’ll redo that change.
I’ve been on some pretty large projects. While these merge issues do pop up it’s not often severe enough that a diff tool can’t get order restored. That will come as you gain more experience. It’s going to look crazy at first.
I can’t stress the first point enough. It’s important to be proactive about it. Know what your team is up to. If you have an incredibly complex split your boards into regions.
Takeaway
Storyboards can be extremely useful, especially for those of you who are very visual. They can also give you a big speed advantage when prototyping ideas. Instead of messing with any code you can quickly throw things in place, connect them up, and start working on the logic that powers the interface.
Your Turn
What tips would you add? Have any nightmare scenarios we should watch out for?
Leave a Reply